A: No. All the existing data/settings will be kept after registration.
A: Yes. Quick Receipt allows you to setup different databases for different companies. In each database, you can have its own settings (header, logo, numbering, etc) and have own folder for documents.
A: Quick Receipt is a standalone application, and does not have network/multi-user access features.
However, you can set the Database Folder to a network drive/shared folder, so that Quick Receipt from different computers can access the same "data".
In Quick Receipt, you can set your database in menu "File > Switch Database" and create a new database in a network drive. In Quick Receipt of another computer, you can set the database folder but choose "Connect existing database".
Quick Receipt in different computers cannot access the same database at the same time. As the database is locked when Quick Receipt is running, Quick Receipt in other computers can only connect the same database
in READ-ONLY mode.
A: It is possible to sync Quick Receipt data with Dropbox, but you need to be careful to ensure that Quick Receipt is only running on one Computer at a time.
You need to install Quick Receipt and Dropbox application on both computers. Please ensure you've install the same version of Quick Receipt on both computers. The Dropbox application should sync the local folder in your computer to the cloud.
Setup First Computer In Computer A, Dropbox is synced to C:\Dropbox\ folder, for example.
You can first create a empty folder (says C:\Dropbox\QuickReceipt) under your Dropbox folder.
Then in Quick Receipt, you can create a database and choose this C:\Dropbox\QuickReceipt\ as the database folder.
After that, you can quit Quick Receipt in computer A.
Setup Second Computer In Computer B, assume Dropbox is synced to D:\Dropbox\ folder.
Please wait and ensure all the files under D:\Dropbox\QuickReceipt\ folder is synced completely.
You can then start Quick Receipt in computer B.
You also need to create a database but choose "connect existing database" and choose the local folder location of your dropbox. (ie. D:\Dropbox\QuickReceipt\).
So, now
- Computer A, Quick Receipt connects to C:\Dropbox\QuickReceipt\
- Computer B, Quick Receipt connects to D:\Dropbox\QuickReceipt\
And these folders are synced to the cloud with the help of Dropbox desktop software.
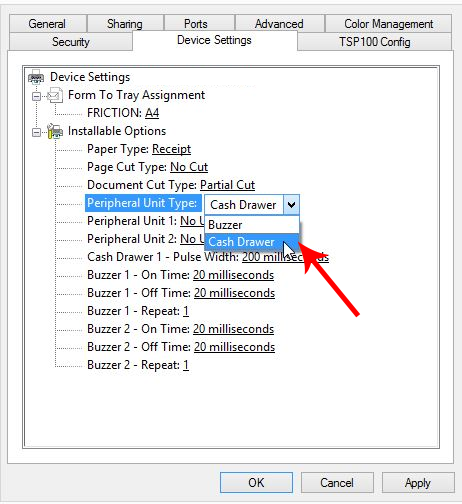
A: Quick Receipt software does not have direct command to control the cash drawer.
If your printer support the feature, you may connect the printer with your cash drawer with an RJ11/RJ12 cable. After that you should enable the feature in Printer Preferences.
In Windows Settings page, go to Printers & Scanners. Select your receipt printer and click [Manage] button. Click on Printer Preferences and look for the Peripherals / Device Settings. Please choose "Cash Drawer" for Peripheral and set it as Document Top then.
A: Yes. You can backup all the documents and related data, reports, and all the settings into a zip format.