Share Workspace between Two Computers
If your business has multiple users who need to access the same documents and data, you can set up multiple computers to connect to a single, shared EasyBilling workspace on your network.
Follow these steps to configure your shared workspace.
Before You Begin: Server & Folder Setup
First, you must create an empty, central shared folder on your server or a networked computer that all users can access with read and write permissions. This folder will be the storage location for all your EasyBilling documents, settings, and data.
Important Notes:
- Do not modify the files or folder structure within the workspace directory.
- Do not move or rename the shared folder after setup.
- Avoid storing any unrelated files in this folder to prevent potential issues.
- To back up your data, you can directly back up this entire folder.
- All computers must use the same version of EasyBilling to ensure data consistency and compatibility.
Note: The folder path \\EVS220J\Work\EasybillingData\ is used as an example in the steps below.
Step 1: Set Up the First Computer
- Open EasyBilling on the first computer.
- Go to the menu “File > Switch Workspace“.
- In the pop-up Workspace list, click the [+] button to create a new workspace.
- In the new window that appears:

- Enter a name for your workspace.
- Select the option to “Start with an empty workspace“.
- Click the [Browse] button next to the “Folder Location” field and select the shared folder path you set up on your server (e.g., \\EVS220J\Work\EasybillingData).
- Click [Save] button.

After saving, the new workspace will appear in the workspace list.

Select it and click the [Switch Workspace] button at the bottom to switch to it. You can now create new documents or change settings in this workspace.
Close EasyBilling before moving to next step.
Step 2: Set Up the Second Computer
- Open EasyBilling on the second computer.
- Go to the menu “File > Switch Workspace“.
- In the pop-up Workspace list, click the [+] button to create a new workspace.
- In the new window that appears:
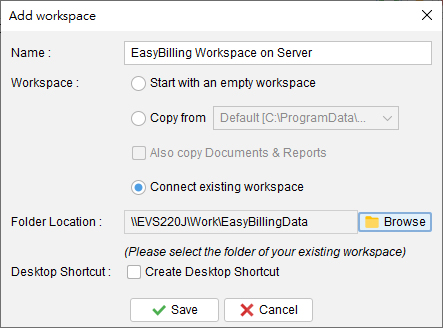
- Enter a name for your workspace.
- Select the option to “Connect existing workspace“.
- Click the [Browse] button next to the “Folder Location” field and select the shared folder path you set up on your server (e.g., \\EVS220J\Work\EasybillingData).
- Click [Save] button.

The new workspace will now appear in the list. Select it and click the [Switch Workspace] button. You should now see all the documents and settings that were created on the first computer.
Close EasyBilling.
Step 3: Set Up All Other Computers
For any additional computers you want to connect to the shared workspace, simply follow the same steps outlined in Step 2.
Important Limitation
When sharing a workspace, only one computer can access the database with full read and write permissions. Since the database is locked while EasyBilling is running, any other computer that connects to the same workspace can only do so in Read-Only mode.
In Read-Only mode, you can still create and edit documents and reports as usual. However, due to a locking mechanism in the database that ensures data consistency, information such as customers, suppliers, products, and software settings can only be viewed and cannot be created or modified.